9.14.2013

{Daily Pics} Fall, Y'all?

I finally decided it was fall. It's still 98 degrees outside here in Dallas, but a few leaves are starting to flutter to the ground and the weather man promises 92 as a high later this week. So maybe the season is tilting slightly toward the autumn time, as much of a tilt as can be provided by hot Texas temps. Which I love, by the way. I'm a warm weather gal through and through. I'd love to spend all my days slathered in tanning oil by a pool smelling coconut and drinking something cold. Something about having quadruplets, though, means that's no longer your daily reality. Ha! Here's some sneak peeks of some fall decor I managed to stick up around the house yesterday (with a post in more detail hopefully next week). Plus a photo of our whole fam at my cousin's wedding earlier this afternoon.

fun fall sunflowers & carnations

my pumpkin-y front porch

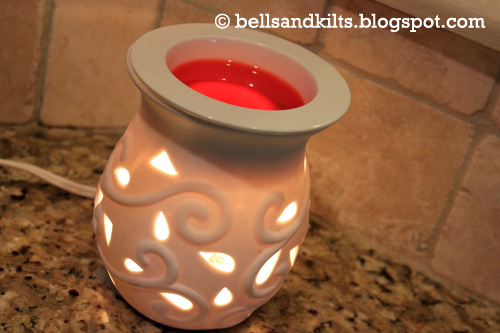
love my wax burner! got this one for $15 at target and am using glade's pumpkin spice wax melts

my entry table with white, gold and blue fall accents

our family!
Up next: in the spirit of fall, a yummy (easy) chicken chili recipe!
post signature

9.11.2013

{My Recipes} Lemon Garlic Pasta with Chicken

I really wanted a light, fresh pasta dinner the other night and came up with this delicious concoction of chicken, pasta, artichoke hearts, lemon juice and garlic. Yum! The quads loved it too and using the large wagon wheel pasta made it easy for them to pick it up with their little fingers.


2 large chicken breasts, cut in small pieces
1 package pasta, any kind will work
2 tbsp minced garlic
2 large lemons or 3 small ones
1/4 cup grated parmesan
1 cup marinated artichoke hearts, quartered
3 tbsp olive oil, plus extra for grilling
Freshly ground sea salt and pepper
Fresh or dried Italian seasonings

First I heated up my stovetop grill pan and wiped it down with some olive oil. I placed all my chicken on top and gave them a hearty sprinkling of salt and pepper. Once they were nearly ready to flip, I squeezed one whole lemon worth of juice on top, then turned the pieces and grilled the other side. While that was cooking, I brought a large pot of water to a boil then added my pasta and cooked to al dente.

Yup, that's me at the end of a busy day running after four kids
and now I'm over a hot grill cooking dinner. Sexy, I know. ;)
After I drained the pasta, I heated the 3 tbsp of olive oil, garlic, artichokes and a generous sprinkling of my dried Italian seasonings over medium heat. Once it was smelling really fragrant and delicious, I added the pasta and squeezed in the juice of the remaining lemons (you can add more or less lemon juice as desired). Next I mixed in the grilled chicken and topped it all with the Parmesan cheese and served with salad, steamed broccoli and garlic bread. A definite crowd pleaser!


Happy eating :)
post signature

9.09.2013

{DIY Project} Monogram Wall Art

I've been trying to decide what creative flairs I could add to the kid's room, since I'm just now working on decorating them. I'd had a couple things stashed before we ever moved in, but they amount to a few wall hangings and accents, a mirror and their first finger paintings preserved in frames I got at Hobby Lobby. Then I saw these really cute square monogram art pieces a friend of mine made for her little girl's room and I knew that's what I wanted to add to Trystan and Logan's room!


I started with a stack of chipboard squares, that I got for 50% off at Hobby Lobby. Then I printed out all the letters I needed to spell out two of the girl's names here


With some cheap-o white craft paint, I painted all the edges white so they wouldn't clash with the art I was putting on the front of the squares.


Then I carefully cut out all my letter squares...


...and mod podged them onto my chipboard.


Ta-dah! They turned out super cute. I haven't hung them up yet, so I'll follow up on that when I put together a post on Trystan and Logan's room once I have a few more things finished. I plan to use 3M picture hangers (not hooks) that provide a sort of velcro patch for light-weight wall objects. That way if I want to move things around later, I don't have eight million nail holes in the walls!


I snuck in some of the roses I clipped from my front yard in the photo above. They smell nearly as sweet as sugar. Plus I was in a good mood since I fiiiinnnaaallly got to complete a crafty craft. The kids really didn't understand the importance of mod podging chipboards for their room so they protested (loudly) every time I was out of their line of sight to work on them in the kitchen. Even though I explained to them how nice it'll be to have things on their walls to look at. Babies...what can you do!? ;)
post signature

9.05.2013

{Quad Squad} Simple Sensory Ziploc Bag!

This little DIY post is just a quick share on a recent "discovery" experience I created for the quads using a couple things around my house. Most of the time, for sensory activities we do things like water play, explore in the grass, grapple with new toys, try a new food or go on an outing. But I needed an indoor, stationary project and this one fit the bill. I checked out a couple "sensory bag" ideas on Pinterest then decided I could throw together my own.


I took four large thick Ziplocs and put a couple squirts of finger paint in them then about an inch or two of water in the bottom, added a couple shakes of glitter and carefully closed the bags. Then I took clear packing tape and taped all four sides of each bag onto our quad table—because they will find those loose corners!—and mixed up the ingredients. Then I added the babies. :)


They loved it! I gave them little balls and toy cars to roll over the bags and they soon abandoned those and just used their hands. Kailey immediately managed to poke a small hole in hers but I put another piece of clear tape across it and problem solved. I would definitely use clear packing tape or something similar, as it peeled off the table easily when we were done and didn't appear to damage the finish.


Before we wrapped up, though, I gave the kids their snacks at the table and they loved chasing the crumbs all over the tops of the bags with their fingers. You could really add any type of glitter, stickers, paint or other ingredients to your bag, as long as there's nothing to potentially cause a leak. (Other than your child's razor finger nails.) I'v heard hair gel and food coloring makes a good combo. The best part? Clean up is a cinch.

Next up: DIY personalized name art for kid's rooms.
post signature

9.01.2013

{My Recipes} Mongolian Chicken with Green Beans

I found a similar recipe online then tweaked it for myself and added some fresh green beans. It was so good, it was quadling approved! Plus, I'd had Mongolian beef at PF Chang's a couple days before and this really tasted just as yummy—not too shabby considering it was my first time to make a dish like this!


2 boneless, skinless chicken breasts 
1/2 lb. fresh green beans, washed & trimmed
2 cups brown rice, cooked
1/2 c. soy sauce
1/2 c. water
1/3 c. brown sugar
2-3 tsp. ground ginger
2 cloves of minced garlic
1-2 tbsp. vegetable or olive oil
1 tbsp. corn starch
1 tbsp. water
I was short on time so I used shredded rotisserie chicken (about two cups worth) instead and it really cut down on prep work. You just add the chicken when the sauce and green beans are done. If you're using uncooked chicken breasts, slice them thin and cook over medium low heat with a little olive oil in a large saute pan. Chop green beans into thirds and steam well until soft.


While the chicken cooks, mix ginger, garlic and 1 tbsp. oil for about a minute over medium high heat in a smaller saute pan. Then add brown sugar, water and soy sauce and bring to a boil then remove from heat. In a separate bowl, whisk together corn starch and 1 tbsp. water then add to sauce mixture. Stir thoroughly then combine with cooked chicken and add green beans. Serve over rice.


This recipe is really versatile—you could use broccoli instead of fresh green beans and add water chestnuts or use steamed white rice instead of brown. Whatever's your favorite! It took about 20 minutes to get the dinner together so it's a great quick fix when you have all the ingredients handy.


Happy eating!
post signature
Related Posts Plugin for WordPress, Blogger...