Showing posts with label Blogger Discovery. Show all posts

7.06.2011

Recipe Challenge, Day 1 of 5

If you plowed through my last entry about my inspirational experience sparked by Julie Powell and Julia Child, then you'll know all about this new blog category entitled Recipe Challenge and what it means.


If you did not read my last entry, then shame on you! But I'll have mercy—I know you were worried—and recount it briefly here. (Which will probably leave you other dedicated readers boggled as to why I couldn't have explained it all in fewer words in the first place.)

Basically, I watched the movie Julie & Julia—which I love and have seen numerous times and always inspires me—then I bought Julie Powell's two books she penned since becoming famous for her cooking blog where she took on Mastering the Art of French Cooking, Vol. 1. Plus, I also bought My Life in France by Julia Child, which I can't wait to read. Having been to Paris myself, I can appreciate her recounts of the life there and it makes me swoon to imagine living overseas again. I've already read the first of Powell's books and will be digging into the second soon.


Recently, I found some of Julia Child's cooking episodes from her show, The French Chef, on the PBS channel. I've begun watching these while I eat lunch to both learn more about her and who she really was and to also glean cooking tips and instruction I've never before considered.


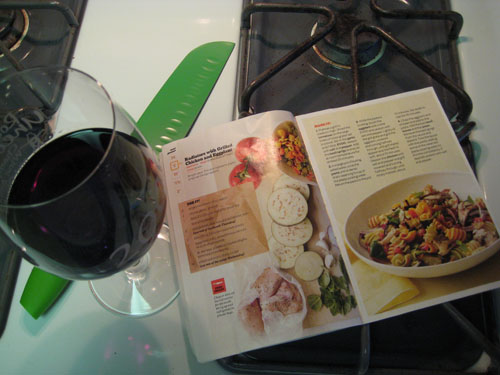
All of this culminated in wanting to challenge myself to grow in the kitchen, and I've decided to begin with a very unlike-Julia Child challenge: Rachael Ray's weeknight meal planner. It comes in every issue of her magazine, Every Day with Rachael Ray, and this is meal one of five.
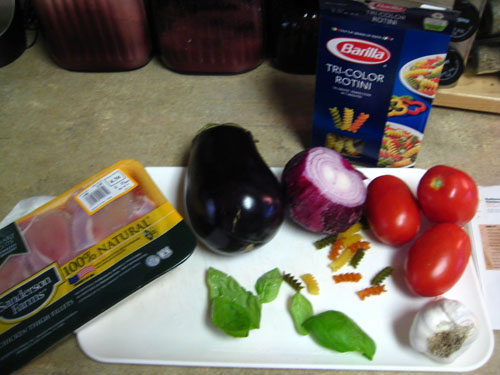

The Ingredients
2 large tomatoes
2 cloves garlic, grated
1 tbsp EVOO, plus more for brushing
2 sprigs basil, plus 1/2 cup basil leaves torn
1 box (12 oz.) tricolor radiatore pasta
1 eggplant, sliced crosswise into 3/4 inch thick rounds
1 lb. skinless, boneless chicken thighs, trimmed of excess fat
1/2 small red onion, thinly sliced

The Instructions
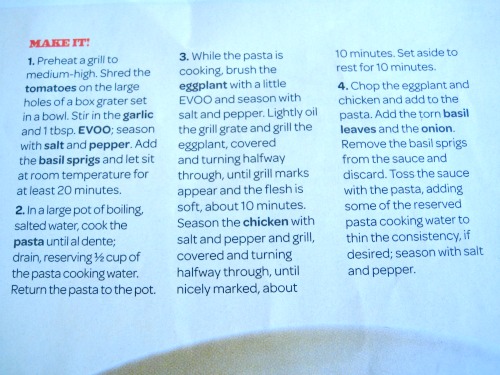
(Here's where I must inject my first disclaimer: I don't always follow the recipe exactly. Usually, I tend to look at recipes as more of a guideline—the framework for a dish that I can then make my own by altering it as I see fit. This could be based on my mood or depleted level of energy, what's available in my fridge, or what may or may not turn out exactly as I had pictured. So, if you want to follow along exactly as Rachael Ray instructs, then click on the following image to view her steps and even print it out if you wish to replicate this in your own kitchen. If you're daring enough to two-step my way, keep reading...)


Step 1: Pour yourself a large glass of wine. This always aids in the act of cooking—if nothing else, in the hope that you've consumed enough by the end that you're satisfactorily tipsy and anything will taste good. (You may also choose to wave around your santoku knife, as I apparently deem necessary while reviewing the recipe.)


Step 2: Set out all your ingredients. My husband aided at the grocery store, so I didn't have the called-upon "large" tomatoes but I did get three roma tomatoes which, in my opinion, work just fine. A tomato is a tomato is a tomato. I had also purchased plenty of basil but this somehow did not make it home. Fortunately, I had also just planted two small basil plants in my backyard so I simply plucked and washed a few leaves from them. It wasn't as much as the recipe calls for, but it will also do. Lastly, the radiatore pasta was all but impossible to find at HEB, and I wasn't about to traipse around to multiple grocery stores for some damn pasta. So tricolor rotini it was!


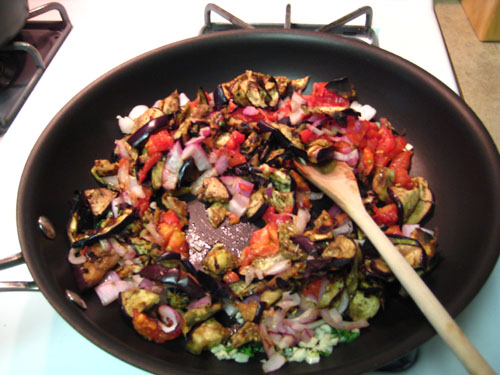
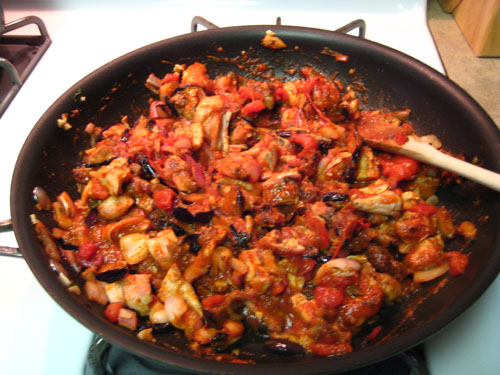
Step 3: Ah, this is where I went astray. Instead of letting the grated tomatoes, garlic, EVOO, basil, salt and pepper marinate together in a bowl, I decided to grill everything. I already knew I was going to be adding some tomato sauce (store-bought in the bottle, gasp!) to beef things up a little, so I wasn't as concerned about making a sauce out of grated tomatoes and olive oil. Thus I sliced up the eggplant, onion, tomatoes and chicken and threw them on the grill, slathered in a bit of EVOO and sprinkled with salt and pepper. Refill your wine glass.


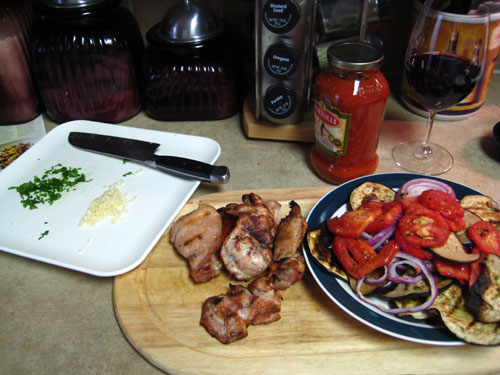
Step 4: While the food grilled, I cooked the pasta. Once the grill and pasta was done, I minced up my garlic and basil, heated a sautee pan with some more EVOO and cooked that for 1 to 2 minutes, until the garlic became fragrant. To my pan of now-fragrant garlic and basil, I added all the grilled veggies, which I had coarsely chopped. I added a tiny bit of organic coconut oil to the mix, to moisten the vegetables and stirred frequently until I felt the flavors had married. 


Step 5: At this point, I needed some sauce on the matter. I added less than half a jar of bottled pasta sauce as well as the coarsely chopped chicken, salt and pepper, heating it all through. Then I heaped bowls with the pasta, topped with the vegetables and sauce and sprinkled with Parmesan cheese.


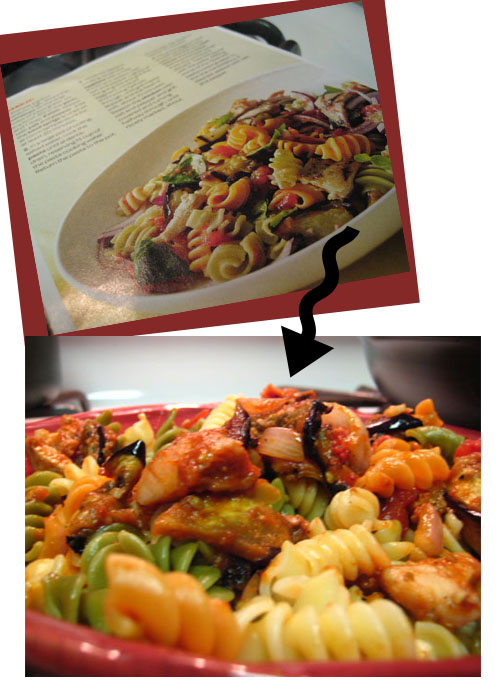
While my final outcome doesn't look exactly like the picture, it was close enough for me and tasted delish! (Again, this is why I don't bake. Eyeballing baking soda and flour isn't successful when you're a slaphappy cook that can't follow a recipe and drinks too much wine in the kitchen.)

The thigh meat definitely added a slightly different, perhaps more rich, flavor then regular chicken breasts would have. And the eggplant was actually good, though if I ever cook this again I'd like to take off the skin since it doesn't get as tender and can be a bit tougher to chew.

Recipe 1 down, 4 more to go! Come back tomorrow for my next Recipe Challenge attempt: Parsley-and-Lemon Cod with Zucchini Salad.

3.16.2011

Light Fantastic

When I was working on my office, I had to get my mind out of the heavily-brown-star-studded Texas country way of decorating and think of lighter, brighter things. Now I'm no designer, mind you. Heck, I've barely got ahold of my own personal interior aesthetic. But I did know that I wanted something a wee bit different than what's in the rest of my house, a tad bit on the whiter side, but still with a touch of, well, me.

By the way, I'm not leading up to another grand reveal. You can see how my whole office turned out right here! However, I do want to share some of the photos I found when looking for creamy, dreamy interiors. Oh, and my, um, recently proclaimed obsession with turquoise might have led me a tiny bit astray on those last two pics. Sorry. But they were too purty not to post. 


Isn't that all-white kitchen just magical? I'd love to cook in there, but at the same time I'd be a little concerned about splattering spaghetti sauce or wayward guacamole. Suppose that might be why my kitchen is so far from white. I'd even share a photo with ya right now, but it's messy and is starting to smell a bit like a chili pot left in the sink too long. Which may or may not be the case. You'll never know.

Fawning over the photo of the kitchen led me to reconsider what I was using for a centerpiece on our dingy, but ever-so-loyal, kitchen table. One day it will be replaced with a Texas star-engraved, mosaic tile-lined eight-seater. But until that glorious day, our plain old four-chair ensemble has to stay. 

I still had our St. Patrick's day centerpiece tray going on, which I liked at first but now it's too low and not interesting enough. 


I found a couple ideas floatin' around on the web and might try out the artichokes in the glass vases eventually. I have plenty of vases on hand and can by fake fruit on the cheap at Hobby Lobby.

Source

Source

Source

Source

Source

In the meantime, I purchased 15 lemons for $3 at my grocery store and a buncha pretty smellin' green stuff (including eucalyptus) for $4 and came up with this much-better-in-my-opinion arrangement.


Decisions, decisions! What do you have for your centerpiece?


2.13.2011

Weekend Recap: Office Lounge

This weekend, which isn't quite over, has been pretty nice and stress free. No major commitments and no hectic schedule. Don't you just love when that happens?

It's not like I don't have a to-do list. Right now, I'm writing this from my office, which currently looks like this:


I haven't gotten around to completely finishing it, thus avoiding posting any pictures of the space as it has progressed. But then I realized today, where's the fun in that? The point of blogging is to be able to share the progress you make on things (or the lack of progress, in this case) and the challenges and successes you come across on the way, right? I think sometimes I get caught up in wanting to have that "picture perfect" photo or outcome to post, and until something ends up that way, I avoid sharing it on my blog.

So to fight that habit, I'm sharing this completely messy unkempt look into my current office state as of five minutes ago. I've got details on how my mom and I painted those stripes and do look forward to sharing that little tutorial soon. It was the result of lots of blog searching, reading, assessing and, ultimately, just going for it.


I'm pretty happy about the bookshelf, though, that's finally starting to come together. So far I've just worked on the top half. I wasn't happy about any of the accessories I kept putting on there, then taking off, rearranging, then adding back, then finally I just took everything down! One trip to Hobby Lobby later, and I was in business. I actually got a clear plan of how I wanted it to look from this photo:


Then I drew a little sketch (yeah, I really did):


And then I picked up a couple items from Hobby Lobby, DIY-ed a few on my own and came up with a much more cohesive look that complements my ivory and cream color scheme in the office without washing everything out. I love the green that feels fresh and cool in here.


I took a cue from Centsational Girl and covered my various books in decorative paper. She actually hand-stamped white banner paper, but I bought the over sized scrapbook sheets at Hobby Lobby. They were on sale 50% off and cost a whopping 29 cents each!


I taped the edge inside the cover of the book, then stretched it around to the other side and did the same thing. If the paper wasn't big enough, then I cut a strip out of a matching sheet to make up the difference. No one will notice, because the books can be stacked together or on top of each other.


It really adds a nice finish, and I've got a couple more stacks of books and frames yet to add, but they're in progress.


As soon as I placed those green plants on the shelves, I knew the color was just what was originally lacking. So I took another blogger cue, this one from Perfectly Imperfect, to use split green peas as a decorative element. I had a large square glass vase and purchased a big milk jug-shaped one from Hobby Lobby and filled them with the split peas. Then I used mint green tea votive candles (I nabbed three votives and two large glass jar candles in that scent for $4.95 from Target!) to nestle in the center.


My other DIY piece was a super green bamboo leaf frame I got from a charity shop in Scotland. I don't even know why I bought it to be honest, it was missing the glass on the front and wasn't a complementary color at all. So a few days ago I painted the frame cream, purposefully letting some of the background color show through, and painted the easel stand part with chalkboard paint. Now I've got my only little chalkboard! I'd been wanting to try this forever and am so happy with how it turned out.


Yesterday I drove to my friend Lisa's house and we hung out and enjoyed a completely lazy Saturday afternoon, which I needed after a killer weights class I attended that morning. Soreness! We watched Sex & the City 2 since Lisa still hadn't seen it and she was the reason I ever got hooked on the show in the first place. We watched every episode of every season while roommates in our cute little town house at Texas State University.

I've also finally subscribed to a ton of magazines at last - some for research, some for the trends and writing style and others for personal enjoyment - so I hauled those over for some leisurely reading while noshing on Lisa's fresh baked blueberry bread and some lemon tea.


We also pulled out our all jewelry supplies but didn't get very far with those. I at least started organizing some of my supplies, as I hope to make a few necklaces and post them for sale. I am obsessed with turquoise and am focusing mostly on turquoise and silver for the necklaces. It's so pretty, I could wear turquoise every day!


But back to Sunday, I'm getting ready to take our dogs out with the husband so the pups can run and play in the sunshine for a little while (there's a field near our house). Then hopefully I'll tackle part of this messy office and see what else I can do to improve the, er, working conditions around here. Don't think I can even dub it "organized chaos" at this point . Clearly, it's just chaos!

The window is open and an almost spring-like breeze is fluttering through the curtains. It goes well with my soundtrack playing from the movie, Country Strong. If you haven't seen that film, you must! It was so good. My two cats are enjoying the fresh air, too. They seem to know whenever a window is opened in the house, no matter where they are, because they always flock to it in seconds. Can't say I blame 'em, it's pretty as a picture outside!


Hope you've enjoyed your weekend! Be sure to come back by this here blog tomorrow for a recipe post on Panko-breaded fish!

2.07.2011

Book It!

I'm still working on decorating my office and trying to finish it up with clean, crisp style. The color palette is so pretty, light and neutral that I don't want to take away from it with too many heavy colors, frames or clutter. I took a break from work today to google tips on decorating book cases and there are so many options out there! You can color coordinate the items on your shelves, right down to the books, which makes a pretty stand-out effect. There were rainbow colors, all white arrangements and even gold on pink. Then, of course, it's all about deciding how many books to put on the shelves and how to make the most of the storage. I came across these pretty pictures as inspiration, the last of which reminded me that a little greenery can break up a monotonous color scheme and be a great addition to office bookshelves.

Belle Maison

Design Decor Staging

via The Designer Insider

via Style at Home
HGTV

via Oliveaux

via Habersham Home


I also got a good tip from an old blog post by Centsational Girl on creating your own book covers for a consistent look on your shelves. I've got tons of books that I like to display, but some of the covers aren't as easy on the eyes. This will be a great solution for using what I've got with a little DIY help!

Centsational Girl


Speaking of books, I just finished Stuart MacBride's latest installation in his Logan McRae series (it took me less than two weeks!). Shatter the Bones was such a thrilling read and I wish he had 10 more just like it. Suppose I'll have to wait another year or two to get my hands on his next tome, so in the meantime I'm scouting for novels by other gritty crime writers. I love a little blood and guts and a good case twist in my bedtime stories. ;) If anyone out there has some suggestions, I'm all ears!

I'd love to see photos of how you have decorated your book shelves and/or book cases. Write up a blog post on these items in your own home, then come back and leave me a comment with a link. If I get enough participants, I'll link everyone up in my office reveal post, coming soon!
Related Posts Plugin for WordPress, Blogger...