Showing posts with label Recipe Challenge. Show all posts

11.10.2011

{Recipe Challenge} Caramel Pumpkin Pudding Cupcakes

I know I haven't been able to share many posts lately—life and work have truly gotten in the way this time, don't these people know I have a blog to maintain? Sheesh.

But you won't be annoyed with me after you read this recipe I'm about to share. If you haven't yet discovered it, caramel pumpkin pudding cupcakes change your life. I think of them very similarly to the slight addiction I have to Starbuck's salty caramel mocha frappuccino. (Which I always get in the light version and sans whipped cream because then it's not a sinful indulgence. Or at least that's what I tell myself when rolling through the coffee shop's drive-thru since my caramel eatin' self is too lazy to get out the car. Hmmm...)


Anyway, my brother-in-law's girlfriend brought these bad boys to dinner the other night. Thanks to some smart ingredient planning, they weigh in at about 108 calories apiece and two grams of fat. However, after stuffing my face femininely eating a small portion of the chicken and beef fajitas I made—along with Spanish rice, a vat of guacamole, white cheese queso and stuffed jalapeno peppers—I still managed to make room for not one, not two but three of them. In retrospect, perhaps I should lay off the caramel. And frappuccinos. And fajitas. And queso.

While I decide what diet I'm probably not going to adhere to (hello spin class tomorrow morning?), please enjoy these mouthwatering photos and a delectable recipe, which I've kindly typed up on a printable recipe card just for YOU!


Don't say I didn't ever give ya anything. 
;)

10.19.2011

{Recipe Challenge} Peach-Whiskey BBQ Chicken

Oh. My. Gosh.

You know when you finally sit down to partake in that meal that you've never had before but you're hoping it's as delicious as it smells? And then when you actually do take a bite, it nearly surprises you with how exceptionally divine it tastes?

That was me and this recipe. I'm tellin' ya... best one I've ever made. And I'll willingly give up the creds, since it came from Pioneer Woman's kitchen.

{Photo from Pioneer Woman}

In her blog post chronicling the recipe, she heralds the peach-whiskey barbecue chicken as one to make when you want to impress your guests who have wandered all the way into town and ended up at your casa, and are gazing up and down the place with an observant eye. Well, slap-some-flour-on-me-and-put-me-in-the-fryer, she was right. I took some photos as I was cooking to give you a sorta guide on how to put it together. Pioneer Woman's pictures are much more delish, but if you wanna know what it's like from a, uh, non-glamorous foodie pictorial angle, then scroll on down. ;)


I set out most of my ingredients so I could be prepared since the sauce is done in several consecutive steps. Used BBQ sauce I had in the fridge, and a cheap-o bottle of peach preserves. I only made about 1/2 the recipe size but still used full bottles of sauce and preserves, which left me with lots of extra sauce to spoon over mashed potatoes. 


Don't cry when you're chopping those onions. They can't feel a thing, I swear.


I did brown up my chicken thighs in some organic coconut oil, to "healthify" the oil and butter called for in the recipe. And I did not use bone-in thighs, my chickens were boneless. Sexy.


Yup, it looks like a lot of onions but pour 'em all in your pot anyway! 


Here's my onions after getting nice and brown, with a teeny bit of caramelization going on. Then I poured in the whisky and stirred while it condensed a little.


My pot with the BBQ sauce and peach preserves added, as well as some hunks of garlic. Mmm mmm, come to momma.


I wanted to serve carrots as a side, so to save time I boiled both them and the potatoes together. No, it doesn't make your taters taste like carrots and no, it doesn't make your carrots taste like taters. Just pluck out the carrots a couple minutes before the potatoes are done since they cook faster.


The sauce was to-die-for. Literally, it was one of the most wonderful things I've ever tasted. Think about it: chicken, barbecue sauce, whisky and peaches. It's the perfect combination of all the great flavors of Texas!

*Note: I drained and smashed my potatoes up when they were done boiling, then added a couple pours of 2% milk, a slab of butter, garlic powder, Lawry's Seasoning Salt, cracked black pepper and a dab of sour cream. The carrots are simply sprinkled with Lawry's.

Ready to amaze your mouth? Get the ingredients and step-by-step printable instructions here. And don't say I didn't warn ya!

7.20.2011

Recipe Challenge, Day 5 of 5

Ta-dah! I did it. Completed my 5-Day Recipe Challenge to create a string of new dishes I'd never tried before, all courtesy of the weeknight meal planner from Rachael Ray's July issue of her magazine, Every Day with Rachael Ray. If you're just tuning in, here are the links to Day 1, Day 2, Day 3 and Day 4.

Day 5 was the best meal of the set, it got rave reviews from both the husband and my friend, Lisa, who joined us for dinner that night. And it was, arguably, one of the easiest recipes as well. So without further ado, let's dig in!


Garlic-Marinated Steak with Corn Salsa
1 lb. skirt steak, halved crosswise (you can also cut the steak up after you've grilled it, or you can use rib-eye steaks like we did!)
Salt & pepper
4 small garlic cloves, peeled and lightly smashed but still whole
2 tbsp. EVOO, plus more for drizzling
1 pkg. corn tortillas
2 ears corn, shucked
2 avocados, cut into bite-size cubes
1 small bunch radishes (about 8), thinly sliced
1/2 small red onion, finely chopped
1 lime, zested and juiced

Step 1) Season your steaks with plenty of salt and pepper, then rub them all over with the smashed garlic cloves. Don't be afraid to smush it in there! You should be able to smell the fragrant garlic. After sliding the garlic around the surface of the meat, discard the garlic and drizzle the steaks with some EVOO and let them sit at room temp for about 15 minutes. Don't skip this step! It really does help the garlic settle in and lets the steak flavor truly marinate before grilling.


Step 2) Oil the grill grate and grill the corn, uncovered and turn occasionally, until blistered. About five minutes or so. When it's cool enough to handle slice the kernels off the cob and place in a large mixing bowl.


Step 3) Grill the steaks, turning halfway through cooking time. (A meat thermometer really comes in handy here to avoid overcooking the steaks, we chose to keep ours around medium for best flavor.) When grilled to desired doneness, remove from grill and let rest for 10 minutes before slicing. While steaks are resting, wrap a stack of corn tortillas in foil and place on non-direct heat on the grill for about 8-10 minutes to warm.


Step 4) Add the avocados, radishes and onion to your bowl of corn kernels. In a small cup, whisk together 2 tbsp. EVOO, and the lime zest and lime juice. Season with salt and pepper then add to the large bowl and toss with your corn salsa.


Step 5) Plate your dinner! A corn tortilla, a few strips of steak and a hearty helpin' of your corn salsa will do it. Best devoured with a nice cold beer. :)


That wraps up my 5-Day Recipe Challenge! I'm glad I did it, though the hard part was keeping up with blog posts, not so much the cooking. I'll admit all five recipes were pretty easy to handle, which was just the point. I knew it was going to be different trying to blog five dinners in a row—and turns out, I had to take a break in between when work and life just got a little too busy to keep up. But it's motivated me to get on the blog more often and share other experiences, from cooking and crafts to projects and vacations. Blogs are a wonderful way to present useful, creative and inspirational information!

The Recipe Challenge isn't over, though. I'll continue to do Recipe Challenge posts in the future, especially when it comes to new and more difficult dishes I've not always had the patience to conquer. I've already selected one for next week, in fact, that's from a wonderful Italian cook book I've been reading through. It involves crisping basil leaves and even making a white bean passatina. Eek!

Until then, c'mon back for a trip recap of our visit to Niagara Falls, the Guadalupe River and some other projects I've been looking forward to sharing. Oh, and bon appetit!!

7.19.2011

Recipe Challenge, Day 4 of 5

I love it when a recipe sort of blossoms into a tasty spread of culinary goodness. Because that's exactly what happened when my friend, Lisa, came over to join me for lunch on Day 4 of my 5-Day Recipe Challenge. This one is simple, but tasty... and you can get some fun ideas from our fabulous selection of lunch-time fare, too!


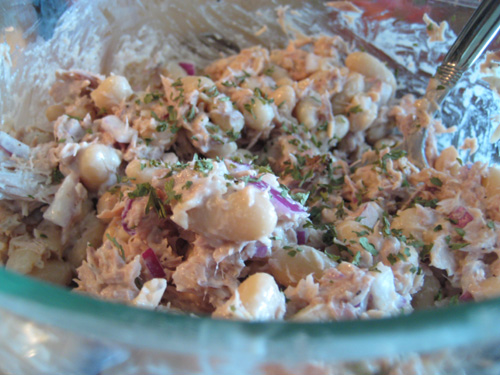
Tuna, White Bean and Arugula Sandwiches
*I don't eat arugula lettuce and we didn't exactly make these into sandwiches, but you can figure all that out for yourself. :)


1 can white beans, drained and rinsed
2 cans tuna, drained (it called for oil-packed, but I used tuna in water)
1 large tomato, chopped
1/2 small red onion, finely chopped
3 tbsp. chopped flat-leaf parsley
3 tbsp. EVOO, plus more for drizzling
1 lemon, zested and juiced
Salt & pepper
3 cupes baby arugula
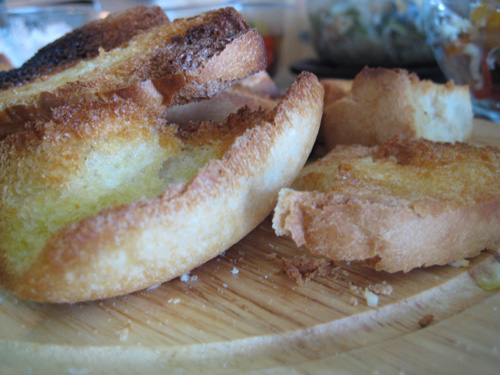
1 loaf ciabatta bread, split lengthwise and cut crosswise into 4 pieces and lightly toasted

Step 1) In a large bowl, combine the beans, tuna, tomato, onion, parsley, lemon zest, lemon juice and 3 tbsp. EVOO. Season with salt and pepper and toss gently with arugula, if desired.


Step 2)  Having nixed the arugula, I opted to simply mix up the tuna salad as instructed and serve on some pieces of bread—your choice, any kind works—brushed with olive oil and toasted.


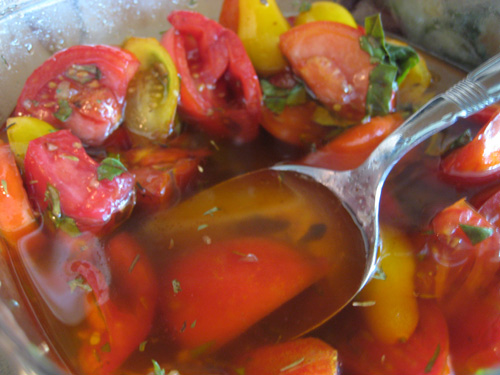
Step 3) We didn't mix in the tomatoes, necessarily, because Lisa brought over a bowl of super fresh tomatoes from her mom's garden—all nicely marinated in olive oil with seasonings.


Our lunch consisted of the tuna, which was really good with the beans and a little garlic mayo I stirred in at the last second, as well as a heavenly spread of several other munchies. We had fresh olives, store-bought mozzarella balls drizzled with balsamic oil, prosciutto-and-cheese stuffed peppers, Lisa's homegrown marinated tomatoes, some re-heated zucchini gratin (get the recipe here), and repurposed leftovers from dinner the night before sprinkled with some feta. Delish!!


As if we hadn't already had more than enough (I mean, my husband came home and thought we'd had a dinner party for six), Lisa whipped up Pioneer Woman's iron skillet apple cake that we paired with scoops of vanilla ice cream. The husband wasn't complaining about appearing in time for that little sweet treat.


And that does it for Recipe #4! The fifth and final recipe posts tomorrow—and it's the best yet, so don't miss it!


7.18.2011

Recipe Challenge, Day 3 of 5

Howdy y'all! After a brief break from the blog, I'm back to finish my five-day cooking challenge I began. Need to catch up? Take a gander at day one and day two.

Recipe #3 was pretty dang yummy and, of course, I inserted a few of my own tweaks to make it perfection for our table. Onward, we commence!


Mozzarella, Shrimp & Grilled Pepper Salad with Croutons 
2 cloves garlic, finely chopped
1/4 cup EVOO
3 bell peppers, mixed colors
1/2 pint grape tomatoes, quartered lengthwise
1/2 small red onion, thinly sliced
1 tbsp. red wine vinegar
Salt & pepper
1/2 large baguette, sliced crosswise into 3/4-inch-thick slices
8 ounces fresh mozzarella cheese (I bought a container of the cherry tomato-sized ones)
1/3 cup torn basil leaves
1 bag frozen shrimp


Step 1) Thaw your shrimp by placing in a colander under cool running water until the ice is melted. Toss around occasionally to thaw evenly.


Step 2) In a small bowl, combine your chopped garlic and the EVOO and let it sit while you prep the next ingredients.

Step 3) Preheat grill to medium-high, while you core and slice your peppers. Lightly oil the grill grate and grill the pepper pieces for 8-10 minutes, flipping occasionally to promote even charring.


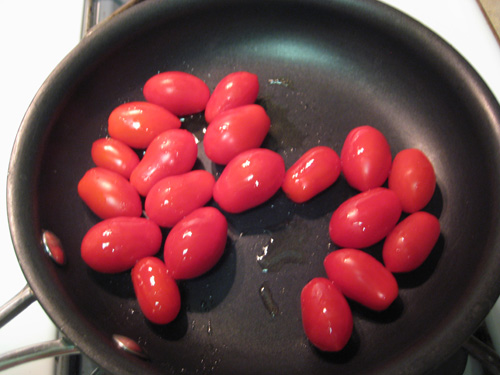
Step 4) The recipe called for uncooked tomatoes, but I prefer mine cooked so I popped them into a saute pan with a little bit of olive oil while my peppers were on the grill...


...after just a few minutes they should soften and brown a tiny bit. Remove from heat.


Step 5) If you haven't already, pour yourself a nice big glass of wine. I've become hooked on the Bota Box of Malbec! After a couple glugs dainty sips, you will feel refreshed and ready to conquer the rest. Or maybe that's just me. Either way, this is my recipe so we're following my steps, right?


Step 6) It's time to grill your bread and the shrimp. Brush the bread slices on both sides with the garlic olive oil you've had marinating. Grill, turning once, until grill marks appears—about 2-4 minutes. Cut into large cubes. If you're me, this comes in handy to discard any burned pieces that fell victim to the fire!

Step 7) Meanwhile, use a grill pan to grill the shrimp (I seasoned mine with a little bit of salt, pepper and feta cheese salad dressing... but S&P would do just fine) until they are opaque white. This should only take a couple minutes, slightly longer than the bread. Stir them around in your grill pan to keep them from overcooking.


Step 8) Lightly all your ingredients together, including the mozzarella balls, basil, red wine vinegar and any of the remaining garlic olive oil. Voila!


We ate every last bite, it was so good. It's almost like a fresh Mediterranean-style dish, if you ask me. I loved the grilled bread croutons and the cooked tomatoes were delicious. The balls of mozzarella didn't lend a lot of flavor, so we actually ended up pulling them out of the bowl and sprinkling in some feta cheese. That seemed to take the flavor up several notches, I highly recommend it!

Thanks for tagging along in the kitchen with me—come back for Recipe 4 tomorrow!


7.07.2011

Recipe Challenge, Day 2 of 5

Welcome to recipe 2 of my 5-day Recipe Challenge!

Catch up with this post if you want the background on this particular cooking series. I'm making my way through Rachael Ray's weeknight meal planner for five dishes, as found in the July issue of her magazine, Every Day with Rachael Ray.

Last night, I tackled the Parsley-and-Lemon Cod with Zucchini Salad. However, similar to my disclaimer yesterday, I definitely had to change up this recipe a little bit. We don't mind fish, but I'm not a big fan of arugula (don't like the spice on the lettuce), raw zucchini (the main component) and tomatoes (the third ingredient). So needless to say, the zucchini salad wasn't going to work for us. I'd already purchased the zucchini though, so instead I tried another new recipe for the vegetable: zucchini gratin. 


The Ingredients

Zucchini Gratin
3 tablespoons (3/4 stick) unsalted butter, plus extra for topping
1 large yellow onion, cut in 1/2 and sliced
2 large zucchini, sliced 1/4-inch thick
1 teaspoon kosher salt
1 teaspoon freshly ground black pepper
1/4 teaspoon ground nutmeg
1 tablespoon all-purpose flour
1/2 cup hot milk (heat this right before you're ready to use, I did mine on the stovetop)
Fresh bread crumbs (make these from the baguette called for below)
Grated cheese (Parmesan, Gruyere, cheddar or mozzarella all work!)

Parsley-and-Lemon Cod
1 lemon, zested and juiced
2-3 tablespoons finely chopped flat-leaf parsley
2 small garlic cloves, minced
Salt & pepper (I used fresh ground sea salt & pepper)
2-4 skinless cod fillets, rinsed and patted dry
1/2 baguette, cut on an angle into long 3/4 inch-thick slices
EVOO or two pats butter


Step 1) I wanted to get the zucchini gratin going first, since that would take the longest to cook, so I sliced up half a baguette into semi-thin pieces, brushed olive oil on both sides of each and put them in the toaster oven for a couple minutes until they were brown all around the top edges. Then I took a couple pieces and crushed them up with my hands to form crumbs for the topping on the zucchini gratin. Reserve your remaining slices for serving with the meal.


Step 2) Pour yourself a cocktail. It's after 5, isn't it?


Step 3) Preheat oven to 400 degrees. Melt that beautiful butter in a large saute pan, then add your onion and cook over low heat for 20 minutes, or until tender but not browned. Add the zucchini and cook, covered, for 10 minutes, or until tender. Add the salt, pepper, and nutmeg and cook uncovered for 5 more minutes. Stir in the flour. Add the hot milk and cook over low heat for a few minutes, until it makes a sauce. Pour the mixture into an 8 by 10-inch baking dish. Combine the bread crumbs and Gruyere and sprinkle on top of the zucchini mixture. Bake for 20 minutes, or until bubbly and browned.
Step 4) Heat 2 tablespoons of butter or EVOO in a large skillet over medium-high heat. Season the cod with salt and pepper, and squeeze half a lemon over the top. Cook, turning once, until both sides are browned—about 8 minutes.


Step 5) In a small bowl, combine your parsley, minced garlic, lemon zest and juice from the remaining half of lemon. Season with salt and pepper, then whisk with a fork to mix. After the fish is cooked and has been removed from the pan, use a whisk to pour in the seasoning mixture and stir around the pan for 1-2 minutes, then spoon the seasoning over the fish. (Ray's recipe called for the seasoning to simply be mixed and then placed atop the fish, but I wanted to heat mine and gather some of the seasonings from the pan.)


The end result? Pretty good, in my opinion, though not near as picture-perfect as Ray's version. My fish sorta fell apart when I retrieved it from the pan and I think I overcooked it by 2-3 minutes. I'm glad I made the zucchini gratin, though, as it was quite tasty and something I'd never tried before. Definitely a better option for us than zucchini salad! 

For Ray's original instructions, click on the image below to view or print for your own reference. The zucchini salad ingredients are: 2 zucchini, 1/2 pint of grape tomatoes (quartered), 3 tbsp. EVOO, 2 tbsp. lemon juice, 2 tbsp. parsley and 1 small clove garlic (minced).


HAPPY EATING!

7.06.2011

Recipe Challenge, Day 1 of 5

If you plowed through my last entry about my inspirational experience sparked by Julie Powell and Julia Child, then you'll know all about this new blog category entitled Recipe Challenge and what it means.


If you did not read my last entry, then shame on you! But I'll have mercy—I know you were worried—and recount it briefly here. (Which will probably leave you other dedicated readers boggled as to why I couldn't have explained it all in fewer words in the first place.)

Basically, I watched the movie Julie & Julia—which I love and have seen numerous times and always inspires me—then I bought Julie Powell's two books she penned since becoming famous for her cooking blog where she took on Mastering the Art of French Cooking, Vol. 1. Plus, I also bought My Life in France by Julia Child, which I can't wait to read. Having been to Paris myself, I can appreciate her recounts of the life there and it makes me swoon to imagine living overseas again. I've already read the first of Powell's books and will be digging into the second soon.


Recently, I found some of Julia Child's cooking episodes from her show, The French Chef, on the PBS channel. I've begun watching these while I eat lunch to both learn more about her and who she really was and to also glean cooking tips and instruction I've never before considered.


All of this culminated in wanting to challenge myself to grow in the kitchen, and I've decided to begin with a very unlike-Julia Child challenge: Rachael Ray's weeknight meal planner. It comes in every issue of her magazine, Every Day with Rachael Ray, and this is meal one of five.


The Ingredients
2 large tomatoes
2 cloves garlic, grated
1 tbsp EVOO, plus more for brushing
2 sprigs basil, plus 1/2 cup basil leaves torn
1 box (12 oz.) tricolor radiatore pasta
1 eggplant, sliced crosswise into 3/4 inch thick rounds
1 lb. skinless, boneless chicken thighs, trimmed of excess fat
1/2 small red onion, thinly sliced

The Instructions
(Here's where I must inject my first disclaimer: I don't always follow the recipe exactly. Usually, I tend to look at recipes as more of a guideline—the framework for a dish that I can then make my own by altering it as I see fit. This could be based on my mood or depleted level of energy, what's available in my fridge, or what may or may not turn out exactly as I had pictured. So, if you want to follow along exactly as Rachael Ray instructs, then click on the following image to view her steps and even print it out if you wish to replicate this in your own kitchen. If you're daring enough to two-step my way, keep reading...)


Step 1: Pour yourself a large glass of wine. This always aids in the act of cooking—if nothing else, in the hope that you've consumed enough by the end that you're satisfactorily tipsy and anything will taste good. (You may also choose to wave around your santoku knife, as I apparently deem necessary while reviewing the recipe.)


Step 2: Set out all your ingredients. My husband aided at the grocery store, so I didn't have the called-upon "large" tomatoes but I did get three roma tomatoes which, in my opinion, work just fine. A tomato is a tomato is a tomato. I had also purchased plenty of basil but this somehow did not make it home. Fortunately, I had also just planted two small basil plants in my backyard so I simply plucked and washed a few leaves from them. It wasn't as much as the recipe calls for, but it will also do. Lastly, the radiatore pasta was all but impossible to find at HEB, and I wasn't about to traipse around to multiple grocery stores for some damn pasta. So tricolor rotini it was!


Step 3: Ah, this is where I went astray. Instead of letting the grated tomatoes, garlic, EVOO, basil, salt and pepper marinate together in a bowl, I decided to grill everything. I already knew I was going to be adding some tomato sauce (store-bought in the bottle, gasp!) to beef things up a little, so I wasn't as concerned about making a sauce out of grated tomatoes and olive oil. Thus I sliced up the eggplant, onion, tomatoes and chicken and threw them on the grill, slathered in a bit of EVOO and sprinkled with salt and pepper. Refill your wine glass.


Step 4: While the food grilled, I cooked the pasta. Once the grill and pasta was done, I minced up my garlic and basil, heated a sautee pan with some more EVOO and cooked that for 1 to 2 minutes, until the garlic became fragrant. To my pan of now-fragrant garlic and basil, I added all the grilled veggies, which I had coarsely chopped. I added a tiny bit of organic coconut oil to the mix, to moisten the vegetables and stirred frequently until I felt the flavors had married. 


Step 5: At this point, I needed some sauce on the matter. I added less than half a jar of bottled pasta sauce as well as the coarsely chopped chicken, salt and pepper, heating it all through. Then I heaped bowls with the pasta, topped with the vegetables and sauce and sprinkled with Parmesan cheese.


While my final outcome doesn't look exactly like the picture, it was close enough for me and tasted delish! (Again, this is why I don't bake. Eyeballing baking soda and flour isn't successful when you're a slaphappy cook that can't follow a recipe and drinks too much wine in the kitchen.)

The thigh meat definitely added a slightly different, perhaps more rich, flavor then regular chicken breasts would have. And the eggplant was actually good, though if I ever cook this again I'd like to take off the skin since it doesn't get as tender and can be a bit tougher to chew.

Recipe 1 down, 4 more to go! Come back tomorrow for my next Recipe Challenge attempt: Parsley-and-Lemon Cod with Zucchini Salad.
Related Posts Plugin for WordPress, Blogger...